C# Library
The information within this section of the developer documents is related to implementing the PosBuddy application using the C# Library.
The below list highlights the headings you will find within this section.
- Requirements
- Installation
- Getting Started
- Other Features
- API Reference
- FAQ
- Appendix A: Data types
Requirements
The C# plugin for PosBuddy has some requirements that need to be met for the plugin to work. There are two different plugins available C#. A plugin for .Net Framework and a plugin for .Net Core. It is advised to use the one that is best supported by your system. The requirements are listed below and may contain links for clarification.
- .Net Framework 4.8 has an OS requirement of at least Windows 10. Further detail about which OS versions support this framework can be found here .Net Framework Requirements
- .Net Core 8 is a cross platform framework and has many different requirements for each operating system it supports and can be found here. .Net Core Requirements
- It is very important that version 4 of the UUID format is used to ensure compatibility with our system.
Before you get started with your implementation, there are some installation steps you need to follow in order to effectively implement the PosBuddy App using the C# library. The installation process is the same for both .Net Framework and .Net Core plugins.
These steps are as follows:
Installation
Before you get started you will need to:
- The Nuget install should automatically add its dependent Nuget packages, which needs to be installed from the public Nuget feed nuget.org
Note:The above can also be installed from a private feed, provided that the package and dependent packages is present on the private Nuget feed.
The Nuget feed is configured to have a source lookup to nuget.org and it should include dependencies automatically.
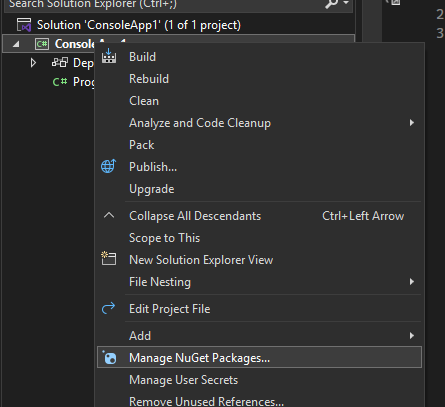
To install the nuget package, first configure the package manager to find your local file. To do that, in visual studio right click on your project name and navigate to Manage NuGet Packages...
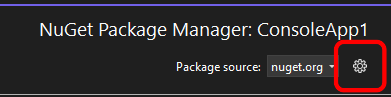
Then in the top right corner, next to the package source drop down menu, click the gear icon.
Once the source manager opens, click the plus button in top right corner to add a source.

A new package source will be created that can be configured to point to a local directory.

Once the package source has been configured, click the update button and click ok to close the window. Now select the new package source and navigate to the browse tab to find the local package.

Select the desired package, pick the appropriate version from the dropdown list and click the install button to start the installation process. Follow the prompts to complete the installation and begin using the plugin.

Once your installation has been completed successfully, the next section to look at is Getting Started..
Getting Started
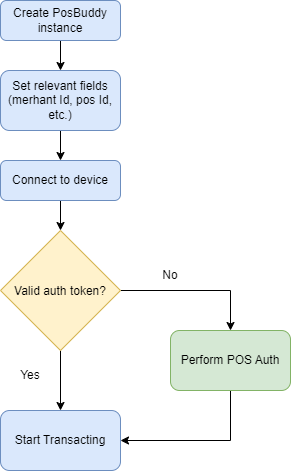
The process of getting the posbuddy library up and running is very simple and can be done by following these steps:
- Create an instance of the
PosBuddyclass. - Set the relevant fields (merchant Id, pos Id, etc.).
- Connect to the posbuddy device.
- Perform a POS Auth (only if you haven't done so before).
- Start transacting.
-
Create an instance of posbuddy
The posbuddy class constructor only has one parameter needed to create an instance variable.
PosBuddyClient = new PosBuddy((logType, message, PbBuildType.Debug) =>
{
    // User can define how to handle log messages here. This example just prints the message to the console.
    Console.WriteLine($"[{logType}] {message}");
});
PosBuddyClient = new PosBuddy((logType, message, PbBuildType.Release) => { // User can define how to handle log messages here. This example just prints the message to the console. Console.WriteLine($"[{logType}] {message}"); }); -
Set the relevant fields
There are only a handful of fields that need to be set before connecting to a posbuddy device. These fields contain the merchant ID and pos ID that are used to for transaction and identifying the POS. The only conditional field is the authentication key. If a successful POS Auth has already been completed and a valid auth token has been obtained, this field can be set before connecting to a device.
posbuddy.SetMerchantId("merchant_id"); // Merchant ID obtained during the onboarding process. posbuddy.SetPosId("pos_id"); // Any user defined identifier for the POS // Conditional auth key field posbuddy.SetAuthenticationKey("auth_key"); // Auth Key obtained by DoPosAuth(). Call this method when a valid auth token has been obtained. -
Connect to the PosBuddy device
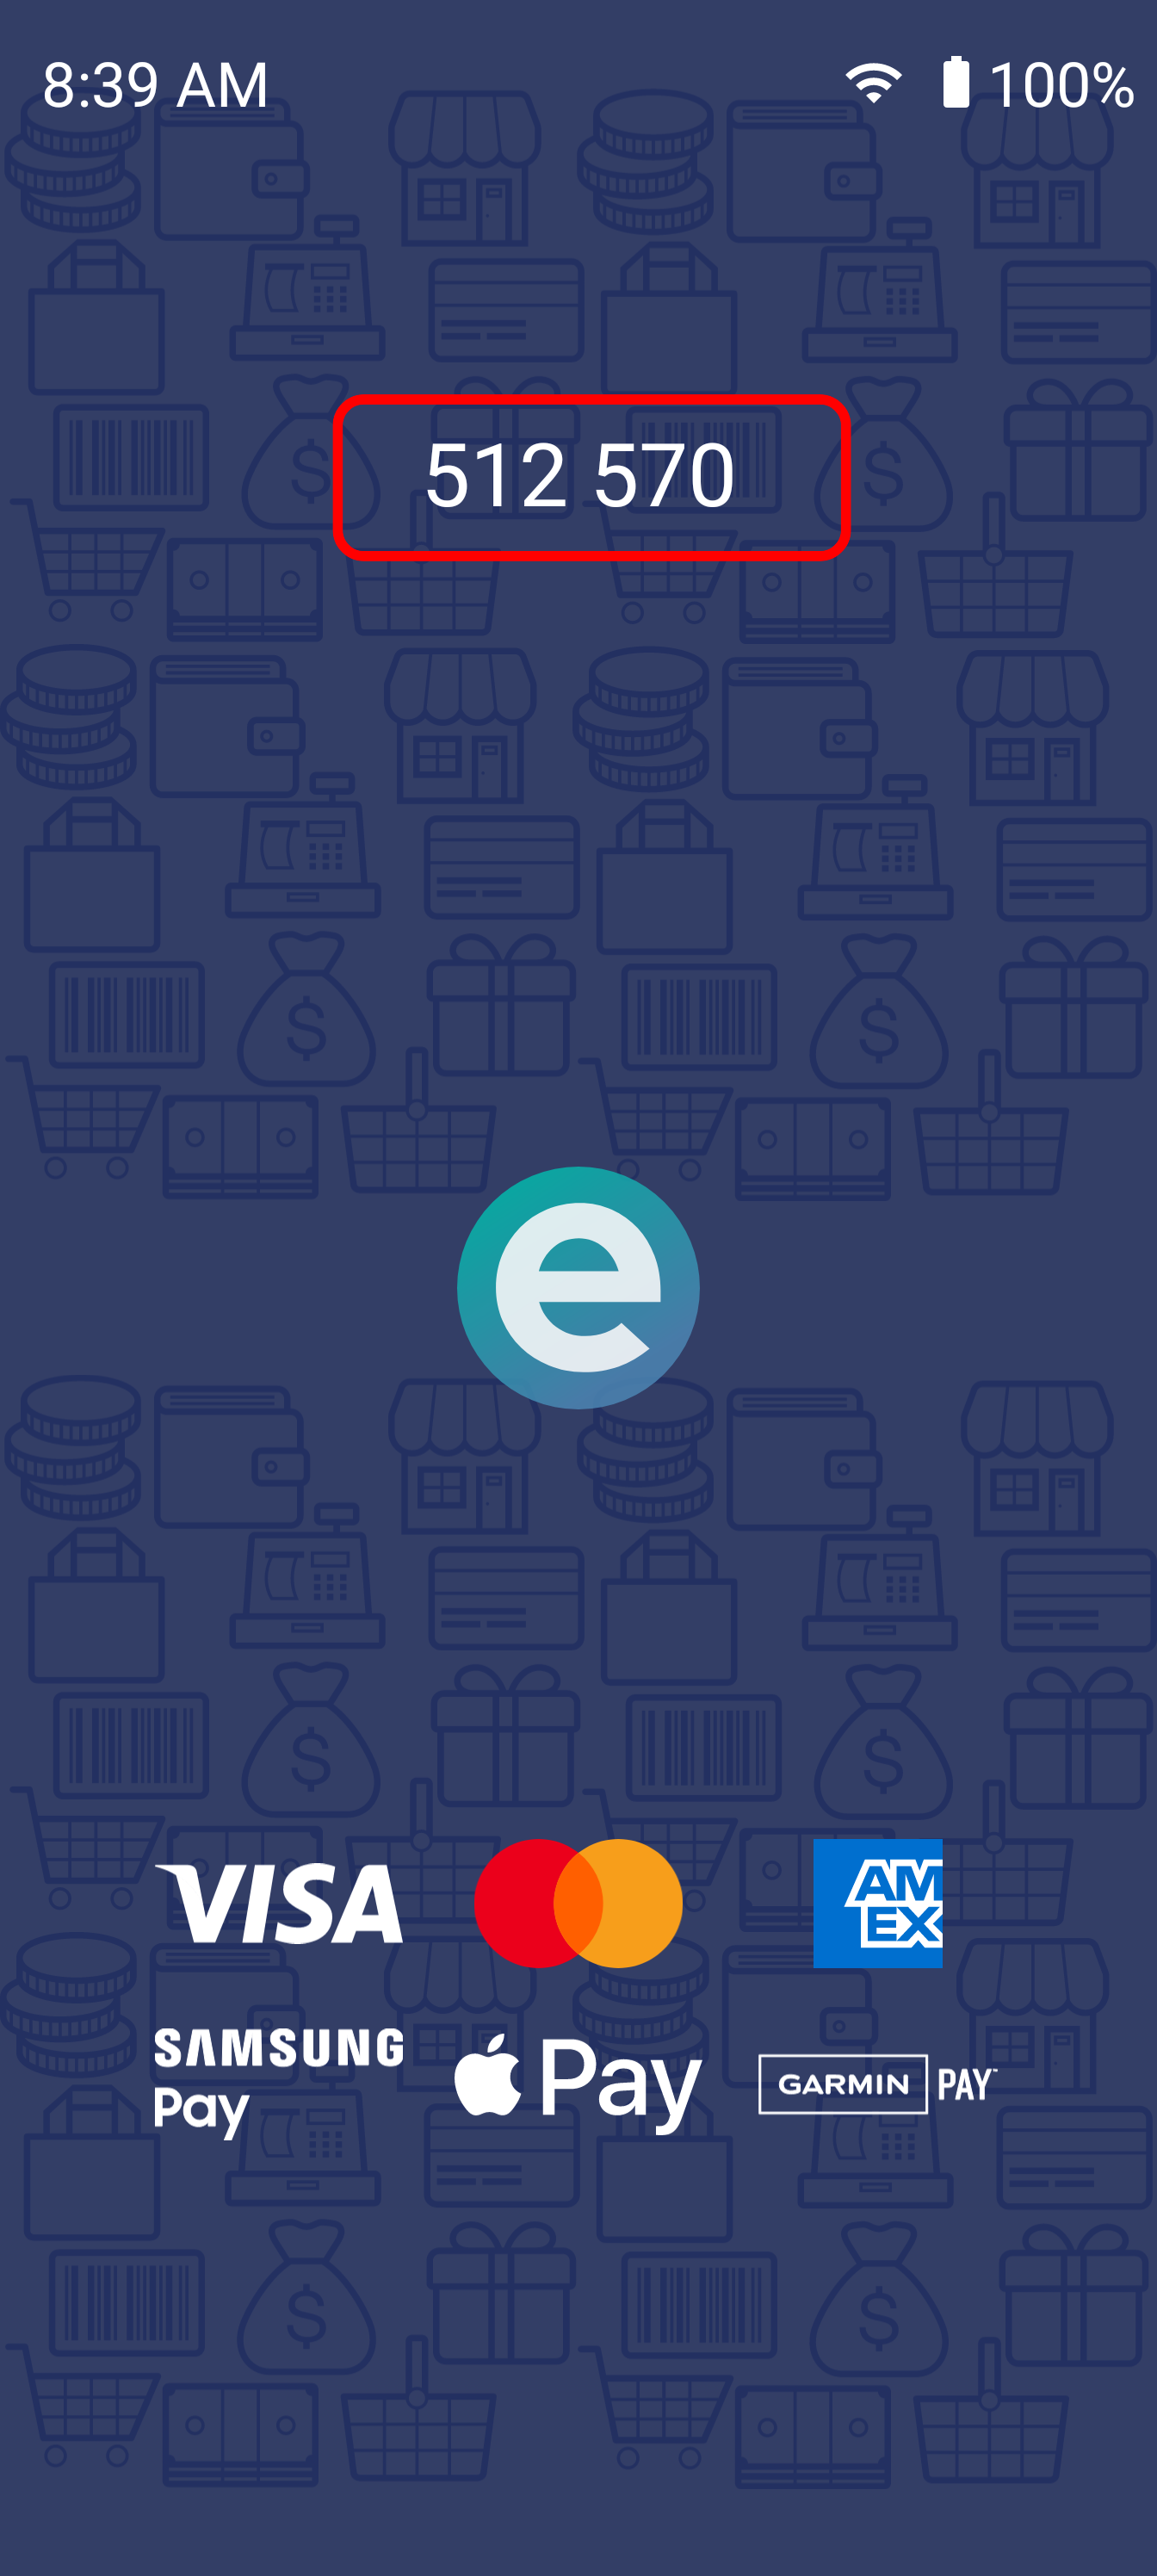
After the relevant fields have been set, the next step is to the connect to the terminal to begin interacting with it and utilizing all posbuddy's features. The parameters include the friendly name of the terminal you want to connect to, and a callback function to process any change in connection status. This status callback will also be used for the duration of the connection in the event of a spontaneous disconnect from the terminal. The friendly name used for connecting to the terminal can be found on the main screen of posbuddy.\
posbuddy.Connect("friendly_name", (status) =>
{
    // User should process any connection changes here.
    // For example:
    switch (status)
    {
      case PbStatus.Connected:
        Console.WriteLine($"Status Callback: Connection success.");
        IsPosBuddyConnected = true;
        break;
      case PbStatus.Disconnected:
        Console.WriteLine($"Status Callback: Connection Disconnected.");
        IsPosBuddyConnected = false;
        break;
      case PbStatus.Error:
        Console.WriteLine($"Status Callback: Connection Error.");
        IsPosBuddyConnected = false;
        break;
    }
});
Important NoteIt is important that the friendly name is easily editable as device can change frequently and it must be possible to update the field locally when it changes.
-
Perform a POS Auth
The next step is to perform a POS Auth to obtain an authentication token(only if you do not already have one). To do a POS auth, all you need to do is call the
DoPosAuth()method with the credentials given to you during the onboarding process. The callback parameter is where your authentication key will be available upon successful authentication.
posbuddy.DoPosAuth("secretKey", "accessKey", (result) =>
{
    authResult = result["resultDescription"] as string;
    if (authResult == "SUCCESS") {
      var authKey = result["authenticationKey"] as string;
      posbuddy.SetAuthenticationKey(authKey);
    }
});
Important NoteIt is also very import to only repeat this process in the event a transaction fails with an expired auth token error.
-
Now that all the setup and initialization is complete you can start transacting and using some of posbuddy's other features. The parameters include the sale amount in cents, any extra parameters that you wish to place in the sale bundle and the callback to process the sale result. In the sale response, it is encouraged to look at theStart TransactingisApprovedflag for an indication of whether or not your sale request was approved or declined.\
// Do a sale for R10.00
posbuddy.DoSale(1000, new Dictionary<string, string>(), (result) =>
{
  	// In this example the result is just printed to the console.
  	Console.WriteLine($"DoSale callback called. Result: {result}");
});
{ "result": "SUCCESS", "commandId": "PAY_APP_RESPONSE", "commandPayload": { "resultDescription": "APPROVED", "isReceiptDataAvailable": "true", "resultCode": "01", "receiptBundle": { "STATUS": "APPROVED", "PROCESSING_CODE": "0", "RC_DESCRIPTION": "Approved", "AMOUNT_CENTS": "10000", "ABS_AMOUNT": "100.00", ... ... ... }, "isApproved": "true", "launchType": "SALE", ... ... ... } }
Other Features
-
Display Line Items
To display the selected line items on the posbuddy device, simply call
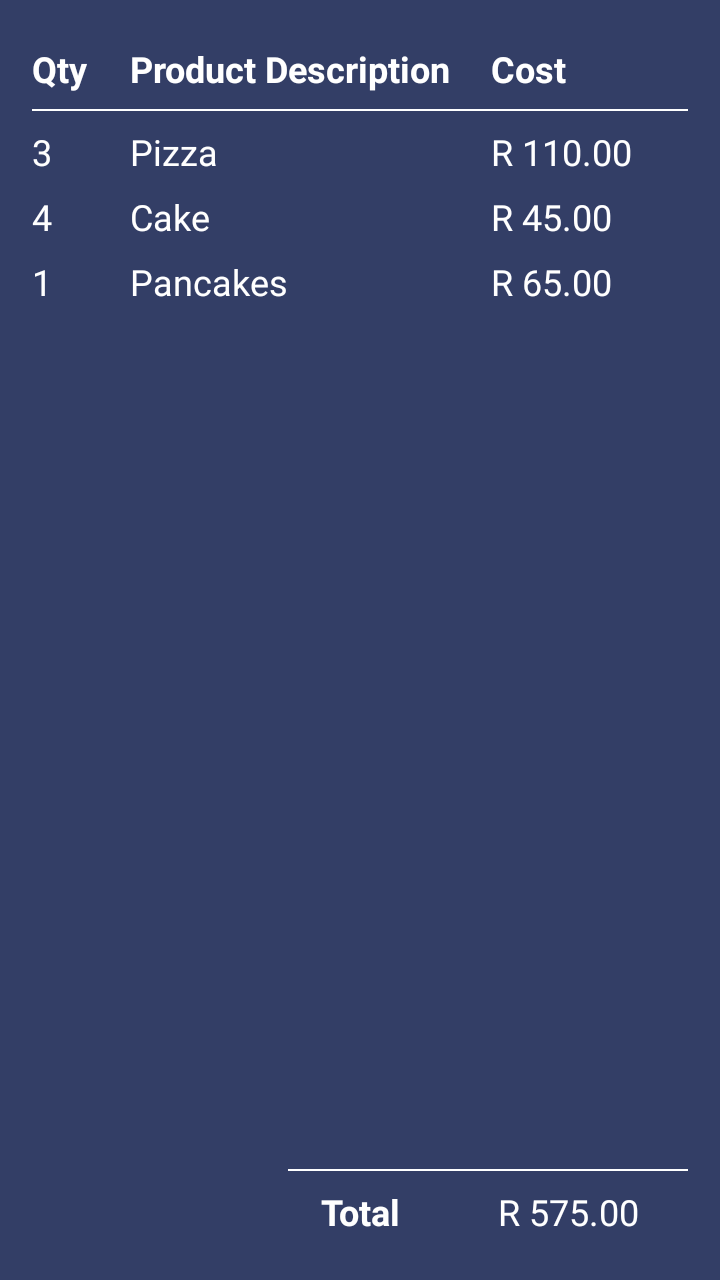
DisplayItems()with a string containing the user formatted total and a list of items to be displayed.// For the sake of this example lets create some items to add to the cart List<PbItems> items = [ new PbItem() { description = "Pizza", price = "R 110.00", quantity = "3" }, new PbItem() { description = "Cake", price = "R 45.00", quantity = "4" }, new PbItem() { description = "Pancakes", price = "R 65.00", quantity = "1" } ]; // Now display those items on the terminal posbuddy.DisplayItems("R 575.00", items);The above example results in the following screen being displayed on the posbuddy terminal:\
-
Transaction lookup
To lookup a previous transaction, you need the transaction's specific UUID; or if the most recent transaction is what you are looking for, that is not necessary.
Sending a transaction lookup request is very simple. All you need to do is call theDoTxRequest()method. The parameters required are the desired transactions UUID (or an empty string for the most recent transaction) and the callback method to receive the receipt bundle if the transaction is found.
posbuddy.DoTxRequest("tx_uuid", (result) =>
{
  // Process receipt bundle here
  Console.WriteLine($"Response received: {result}");
});
NoteFor transaction surety and reconciliation, it is strongly recommended that this feature is implemented
-
Device discovery
This posbuddy plugin provides a feature to discover posbuddy terminals on the network. A comparable system to help understand the feature is google cast. Just as google cast allows the user to see available TVs or Chromecast devices to stream your videos to, this allows the user to view available terminals.
To start the discovery just call the
StartPosBuddyDiscovery()method. This will then search for posbuddy terminals in the background. At any time while the discovery is active, theGetDiscoveredDevices()method will return a list of devices that have been found. Alternatively to receive live updates while the discovery is active, call theSetDiscoveryCallback()method before starting the discovery to set the callback that is used whenever the list of devices is updated.posbuddy.SetDiscoveryCallback((devices) => { // Process updated list of devices here }); posbuddy.StartPosBuddyDiscovery();It is very important that when you are satisfied with the discovery results or the results are discarded, that you call the
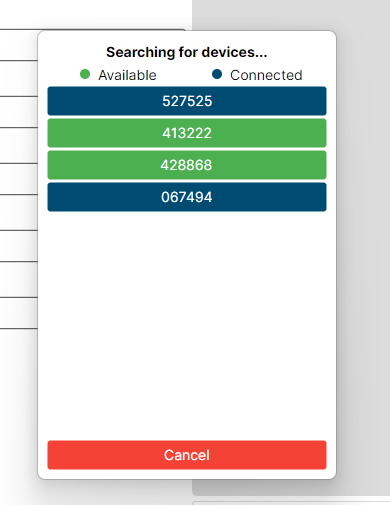
StopPosBuddyDiscovery()method.posbuddy.StopPosBuddyDiscovery();An demo of this feature is included in the desktop demo application that is provided along with our plugin. In this screenshot, a number of devices are found on the network. The different colours indicate the device's current connection status. The data structure that represents the posbuddy device has a field that indicates if the terminal is available for use or currently connected to another POS.
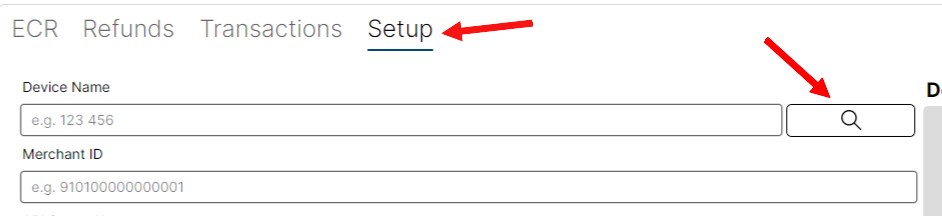
To start this feature in the demo app, navigate to the setup tab and click the button with the magnifying glass icon.
-
To do a cashback transaction, all you need to do is modify the parameters that are passed to theCashbackdoSale()method. The call then works as follows: The amount that is passed in the amount field of thedoSale()is then the total amount of the sale with the cashback amount added and an extra parameter is passed in theextraParametersfield. For example, lets say the amount of the items being purchased is R50.00 and the customer requests a cashback of R20.00, then the amount passed todoSaleis R70.00 and the R20.00 is passed with acashAmounttag in theextraParametersfield.\
var extraParameters = new Dictionary<string, string>
{
    { "cashAmount", "2000" }
};
return _posBuddyClient.DoSale(7000, extraParameters, (result) =>
{
  //Process this like any other sale
  Console.WriteLine($"Response received: {result}");
});
API Reference
What is an API function?An API functions with the goal of allowing different systems, applications and devices to share information with each other. APIs work by translating a user's input into data, which helps a system send back the right response
Please refer to Appendix A - Data types for more information on parameters used throughout the library.
Connect
PbResult Connect(string deviceId, Action<PbStatus> callback)
Connects to posbuddy device using a websocket connection.
ParametersdeviceId: The device Identifier string.callback: The status callback which will propagate the status of the websocket connection.\
NoteTo ensure the plugin function correctly, make sure to set the merchant ID and POS ID fields using their respective set methods before calling
Connect().The callback that gets passed to this method is also used for any connection status changes for this connection. For example if the connection is broken by a network loss or the posbuddy device disconnects for any reason, this is the method that is called when that connection status changes.
Disconnect
PbResult Disconnect()
Disconnects from the posbuddy device.
Clear Items
PbResult ClearItems()
Clear the items on the line display of the terminal.
Display Items
PbResult DisplayItems(string totalCost, IEnumerable<PbItem> items)
Display items on the terminal: Quantity, cost, description and total Cost.
ParameterstotalCost: Total cost to display on terminal screen in cents.items: List of items to display on terminal screen
Foreground
PbResult SetForeground(bool foreground, Action<IDictionary<string, object>> callback)
Sets whether or not the PosBuddy app is in the foreground or background of the terminal.
Parametersforeground: Flag to indicate PosBuddy visibility.callback: The callback to receive the operation result.
Settings
Get Settings
PbResult GetSettings(Action<IDictionary<string, object>> callback)
Queries the terminal for the current autoStart and runInBackground settings.
Parameterscallback: The callback to receive the settings.
Update Settings
PbResult UpdateSettings(bool autoStart, bool runInBackground, Action<IDictionary<string, object>> callback)
Update the terminal settings for autoStart and runInBackground.
ParametersautoStart: Flag to set PosBuddy to start automatically on device boot.runInBackground: Flag to minimize PosBuddy after a transaction.callback: The callback to receive the operation result.\
POS Auth
PbResult DoPosAuth(string secretKey, string accessKey, Action<IDictionary<string, object>> callback)
Do a pos auth. We Authenticate the POS once which allows it to forward the authkey to the transacting terminal.
ParameterssecretKey: The provided secret key.accessKey: The provided access key.callback: The auth callback action which will receive the authentication response payload.
The structure of the response received in the callback is as follows:
{
  "result": "SUCCESS",
  "commandId": "POS_AUTH_RESPONSE",
  "commandPayload": {
    "resultDescription": "SUCCESS",
    "authenticationKey": "RECEIVED-AUTH-KEY",
    "sessionTimeout": "86400000"
  }
}
RemarksOn success, the authentication key will be available inside the dictionary received by callback. The software needs to set this authentication key to the device using
SetAuthenticationKey()before a transaction can be initiated. The POS id must be set before calling this function - see theSetPosId()function. ADoPosAuth()call only needs to happen once to obtain an authentication key and should only be repeated if a transaction fails with an expired auth token error. Repeating this function call with every transaction will place unnecessary strain on our servers and potentially cause problems elsewhere.
Sale
Sale Transaction
PbResult DoSale(long amount, IDictionary<string, string> extraParameters, Action<IDictionary<string, object>> callback)
Initiate a sale transaction.
Parametersamount: The amount of the sale.extraParameters: Extra parameters to include on the sale payload.callback: The sale action callback which will return the result of the sale.
Sale Refund
Note:When a merchant is onboarded, the merchant will be configured for one of the following types of refunds:
- Matched Refund
- Card Unmatched
- Card Matched
- Unmatched Refund
Please see below table indicating the differences between the refund types, and what parameters are required to be sent in the refund request:
Matched Refund Unmatched Refund Card Matched Enabled Card Matched Disabled Mastercard Other Cards Original transaction UUID required X X Original Card required X Original transactionLinkIdentifier required* X Refund cannot exceed the original amount X X X N/A Multiple refunds on original transaction* X X X N/A *The transactionLinkIdentifier is returned in the initial SALE response message. The POS is responsible for storing this value if unmatched refunds need to be processed.
*The total refund amount for all transactions may not exceed the original transaction amount
PbResult DoRefund(string uuid, int amount, IDictionary<string, string> extraParameters, Action<IDictionary<string, object>> callback)
Initiate a refund transaction.
Parametersuuid: The original transaction UUID.amount: The amount of the refund.extraParameters: Extra parameters to include on the refund payload.callback: The refund action callback which will return the result of the refund.
QR
QR Sale
PbResult DoQrSale(long amount, PbExternalQrProperties externalQrProperties, IDictionary<string, object> extraParameters, Action<IDictionary<string, object>> callback)
Initiate a QR Code sale transaction.
Parametersamount: The amount of the QR sale.externalQrProperties: External parameters required for a QR sale.extraParameters: Extra parameters to include on the QR sale payload.callback: The action callback which will return the result of the QR sale.
QR Refund
PbResult DoQrRefund(string transactionUuid, long amount, PbExternalQrProperties externalQrProperties, IDictionary<string, object> extraParameters, Action<IDictionary<string, object>> callback)
Initiate a QR Refund transaction.
Parametersamount: An amount smaller or equal to the original QR transaction.transactionUuid: The UUID of the original QR transaction.externalQrProperties: External parameters required for a QR refund.extraParameters: Extra parameters to include on the QR refund payload.callback: The action callback which will return the result of the QR refund.
Deposit
PbResult DoDeposit(long amount, IDictionary<string, string> extraParameters, Action<IDictionary<string, object>> callback)
Initiate a deposit transaction.
Parametersamount: The amount of the deposit.extraParameters: Extra parameters to include on the deposit payload.callback: The deposit action callback which will return the result of the deposit.
Balance Enquiry
PbResult DoBalanceEnquiry(string> extraParameters, Action<IDictionary<string, object>> callback)
Initiate a balance enquiry.
ParametersextraParameters: Extra parameters to include on the balance enquiry payload.callback: The balance enquiry action callback which will return the result of the balance enquiry.
Transaction Request
PbResult DoTxRequest(string uuid, Action<IDictionary<string, object>> callback)
Request the data on a specific transaction. To request the last transaction done, simply leave theuuidfield empty.
Parametersuuid: The UUID of the desired transactioncallback: The transaction request callback which will return the result of the request.
Commands
Ping Device
PbResult PingDevice(Action<PbPingPayload> callback)
Sends a ping request to the device and verifies if it receives a reply back.
Parameterscallback: The ping callback action which will return the response payload of the ping request, containing some information on the device.
Print HTML
PbResult PrintHtml(string html, string css, int width, Action<string> callback)
Send a print HTML command to PosBuddy.
Parametershtml: The HTML string containing the layout for desired print job.css: The CSS string containing formatting for the HTML.width: The width of the device printer in pixels.callback: The print callback action which will contain the payload of the print response.
POSBuddy Discovery
Start POSBuddy Discovery
void StartPosBuddyDiscovery()
Start the discovery of PosBuddy devices on the network.
NoteFor this feature to work correctly it is important to call
StopPosBuddyDiscovery()when the desired device is found or discovery is canceled.To receive live updates while discovery is active, make sure to set the discovery callback with
SetDiscoveryCallback()before theStartPosBuddyDiscovery()call.
Stop POSBuddy Discovery
void StopPosBuddyDiscovery()
Stops the discovery of PosBuddy devices on the network.
List Device
List<PbDevice> GetDiscoveredDevices()
Return a list of posbuddy devices discovered on the network.
Authentication Key
-
PbResult SetAuthenticationKey(string authenticationKey)
Set The authentication token that was generated by the server on a successful authentication request.
ParametersauthenticationKey: The authentication key string returned when performing auth.
-
PbResult SetBarcodeCallback(Action<string> callback)
Set the function to call when a barcode is scanned.
Parameterscallback: The callback action when a barcode is scanned by the device while its connected.
Discovery Callback
PbResult SetDiscoveryCallback(Action<List<PbDevice>> callback)
Set the function to call when a posbuddy service is found.
Parameterscallback: The callback action when a barcode is scanned by the device while its connected.
Merchant ID
PbResult SetMerchantId(string merchantId)
Set the Merchant ID. Needed for transacting.
ParametersmerchantId: The merchant ID string.
POS ID
PbResult SetPosId(string posId)
Set the pos identifier to be used for this session
ParametersposId: The pos identifier related to where the transactions will be initiated from.
FAQ
-
To ensure the device discovery is working correctly, confirm that the terminal and the POS are on the same WiFi network, or at least be able to communicate through network routing. Once device networking is confirmed, restart PosBuddy by clicking the force stop button in the application info screen within the application settings. Also try manually entering the terminal friendly name and connect and disconnect from the terminal to internally restart the discovery service. The next step is to make sure that the POS' network settings allow the POS application's network traffic though the firewall on the current network type (public/private).Device discovery is not picking up any terminals
Appendix A - Data types
In the code sample below you will find all the data types along with a description that are necessary for your POS Buddy implementation
/// Status of the websocket connection
public enum PbStatus
{
    /// The status when the websocket connection is connected.
    Connected = 1,
    /// The status when the websocket connection gets disconnected.
    Disconnected = 2,
    /// The status when errors happen with the websocket connection.
    Error = 3
}

/// Provides a definition for the different types of log messages the client can forward via the log callback.
public enum PbLogType
{
    /// The log type for info messages.
    Info = 1,
    /// The log type for warning messages.
    Warning = 2,
    /// The log type message for when we transmit data.
    TransmitData = 3,
    /// The log type message for when we receive data.
    ReceiveData = 4,
    /// The log type for any errors which occur.
    Error = 5
}

/// Return values for POS Buddy functions
public enum PbResult
{
    /// Result went everything is OK
    RESULT_OK = 0,
    /// Result for any unsupported actions or parameters
    NOT_SUPPORTED = -1000,
    /// Result for any missing required parameters
    MISSING_PARAMETERS = -1001,
    /// Result for any errors parsing the JSON
    PARSE_JSON_ERROR = -1002,
    /// Result when no response was received
    NO_RESPONSE = -1003,
    /// Result when there is a comms error
    COMMS_ERROR = -1004,
    /// Result when an invalid response is received
    INVALID_RESPONSE = -1005,
    /// Result when authentication has not been performed or authentication key is not populated
    AUTH_ERROR = -1006,
    /// Result When calling do sale but an existing sale is still in progress
    SALE_IN_PROGRESS = -1007,
    /// Result when there is a comms issue on the server
    SERVER_COMMS_ERROR = -1008,
    /// Result when comms has not been initialised
    COMMS_NOT_INITIALISED = -2000,
    /// Result when there is an error opening the websocket
    ERROR_OPENING_WEBSOCKET = -2002
}

/// Status of the POS Buddy device
public enum PbDeviceStatus
{
    /// The device is available for use
    Available = 1,
    /// The device is currently connected to a POS and needs to be disconnected before it becomes available
    Connected = 2,
}

/// <summary>
/// A container for the external parameters used in a QR transaction
/// </summary>
/// <param name="ExternalInvoiceGuid">A GUID that identifies a particular invoice that may appear on more than one transaction.</param>
/// <param name="ExternalTransactionDateTime">The DateTime of when the transaction was generated.</param>
/// <param name="ExternalRrn">A 3rd party generated RRN.</param>
/// <param name="ExternalTerminalId">A terminal identifier for the device.</param>
public record PbExternalQrProperties(
    string ExternalInvoiceGuid,
    DateTime ExternalTransactionDateTime,
    string ExternalRrn,
    string ExternalTerminalId
);