Validation - Retail Auth
What is Validation - Retail Auth?
Before any card transactions can be processed, the user of the Ecentric Payment app must be authenticated and provide an auth token for each payment request.
The process of authentication is referred to as Retail auth.
A Retail auth request is performed to obtain the authentication token that is needed by the merchant to perform transactions.
To authenticate the user and obtain an auth code, 3rd party developers must launch the Ecentric Payment app via an Android Intent Scheme and then store the auth code response in a session for subsequent card processing requests on the Ecentric Payment app.
How does it work?
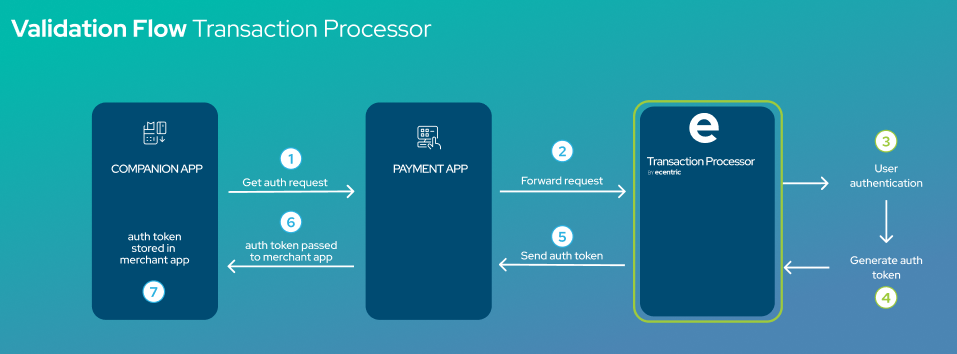
The diagram below shows an example of how the Retail Auth Companion APP works together with Ecentric Payment app and Back Office.

Retail Auth validation flow
Process Description:
Step 1:
From the Companion App, the merchant must initiate a GetAuth request which is sent to the Payment App.
Step 2:
The Payment App will receive and send the GetAuth request to the Ecentric backend.
Step 3:
Once received, the Ecentric Backend will perform a User Authentication step
Step 4:
If the User Authentication step is successful, the backend will then generate the Authentication token.
Step 5:
The Authentication token is then sent back to the payment App
Step 6:
The payment App then passes the Authentication token to the Companion App
Step 7:
The companion App will then store the Authentication token and use this token for all future transactions.
Using the correct namespace
All code blocks in this document utilize the standard namespace for the Ecentric Payment app: payment.thumbzup.com
Please replace this namespace throughout in the below scenario:
- If you are an eCentric merchant and are utilizing the Ecentric Pay app on a SUNMI payment device, please use the following namespace: ecentric.thumbzup.com
Retail Auth request
private String appURL = “payment.thumbzup.com”;
private String appClass = “payment.thumbzup.com.IntentActivity”;

Intent intent = new Intent();
intent.setClassName(appURL, appClass);
Bundle dataBundle = new Bundle();
dataBundle.putString(“launchType”, “RETAIL_AUTH”);
dataBundle.putString(“merchantID”, “YOUR MERCHANT ID");
dataBundle.putString(“secretKey”, “YOUR SECRET KEY”);
dataBundle.putString(“accessKey”, “YOUR ACCESS KEY”);

intent.putExtra(“thumbzupBundle”, dataBundle);
startActivityForResult(intent, 0);
The table below describes each of the parameters that can be used for the authorization request.
| Parameter | Meaning |
|---|---|
| launchType | “No Auth” is used for launching the Ecentric Payment app authenticate a user and to obtain an auth token |
| merchantID | The merchant ID assigned to the merchant |
| secretKey | To be provided by Ecentric |
| accessKey | To be provided by Ecentric |
Retail Auth Response
When the authorization from the server has been received by the Ecentric Payment app, the 3rd party app will have to receive the auth token and resume the app flow accordingly.
This is done by using the below code:
@Override
protected void onActivityResult(int requestCode, int resCode, Intent data) {
    String result = "";
    Bundle b = new Bundle(data.getBundleExtra("thumbzupApplicationResponse"));
    if(resCode == Activity.RESULT_OK) {
        // handle ok result
        String launchType = b.getString("launchType");
        String resultCode = b.getString("resultCode");
        String resultDescription = b.getString("resultDescription");
        String merchantName = b.getString("merchantName");
        String authenticationKey = b.getString("authenticationKey");
    }
}
Below is an example of the data fields you may receive in a successful validation request:
- ResultDescription: COMPLETED
- No errorBundle
- AuthenticatonKey: <received auth key>
Note:If the Retail Auth response returns an error in the "resultCode" then you may not be able to connect to the payment application and thus not be able to transact on the device.
If for any reason the auth token validation has failed or could not be completed successfully, the error will be displayed in the form of the below code:
public static final String errorTypeKey = "errorType";
public static final String descriptionKey = "description";
public static final String messageKey = "message";
public static final String referenceKey = "reference";
Below is an an example of the data fields you may receive in a unsuccessful or failed validation request:
- ResultDescription: ERROR / ABORTED
- Description: Error connecting to server |
- extra info, e.g Network connection failed OR Merchant ID is missing OR Secret / Access Key is missing
- ErrorType: SERVER / OTHER / TIMEOUT / CERTIFICATE / UNKNOWN / AUTHENTICATION
Updated 3 months ago
